
This tip looks at the task of creating reports. Often the toughest parts of a program to develop are the reporting procedures that get data back out of the database onto paper. That's why I think we should leave them all out. As a matter of fact, according to David Bayliss, “every[one] knows that real programs don't have reports in them.” (Yes, he was being sarcastic.)
Several of the early programs I wrote with CW 1.0 were reporting programs for the company I worked at. While writing those programs I had to learn how Clarion handles reports and what techniques improved the look of my reports. The method I developed is by no means the only method or the best method, but it has worked for me in the past.
I follow a process with three main steps when developing reports:
Every report I have designed has been hand-coded, so the third step should disappear when using report templates and the second step may need to be modified slightly.
The example I am using demonstrates this development process applied to an invoice. The entire development for this procedure originally took just over 4 hours once the initial mockup of the report was approved.
As with everything else in Windows, there is a paradigm shift that occurs when designing reports. In the DOS world, most reports were line-based. You printed a report header and then a series of lines. Maybe first there would be a group header line, then some detail lines, and then a group footer line and some totals.
Windows reports are page-based. As you print the report information, the page is composed in memory. Once the page has been completely built in memory, the entire page is transferred to the printer.
Because Windows reports are page-based, it is best to design them as “pages” rather than as “lines.” I do this by starting with a clean sheet of paper and drawing what I want the final page to look like.
There are two advantages to this approach. First, it is easier to work with a piece of paper and sketch what you want the report to look like than it is to shuffle items around and use the preview in the report formatter. Second, if you have to have the report approved it is easier to go through that process at the beginning and make all of the changes early than it is to go back and make them once the coding on the report has been completed.
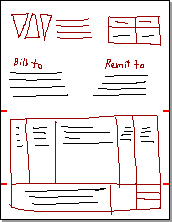 This picture shows what the final report sketch looked like right before I started
writing code. By the time it reached this stage it had been approved by five
different people who each had changes to be made.
This picture shows what the final report sketch looked like right before I started
writing code. By the time it reached this stage it had been approved by five
different people who each had changes to be made.
This invoice, like most reports, is divided into three main sections. The header contains address information as well as the invoice number and invoice date. The body contains the individual detail lines for each item on the invoice. The footer contains totals for the invoice and an area for a message to be printed on the invoice.
The picture has red marks at the edge of the page to identify the breaks between the header, body, and footer. The picture also distinguishes between items that are constant on each report page (the red items) and items that change for each report (the black items). The constant items will be put onto the report FORM. The changing items will be put into the HEADER, body and FOOTER.
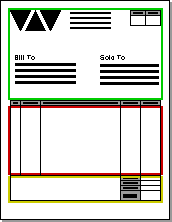 Once the initial paper design is completed, almost all of the information needed
for the report structure can be pulled directly from the paper design using
a ruler. This picture takes the sketch of the report and refines it to show
what the final report will look like. The areas for the header, footer, and
body have been marked with green, red, and yellow boxes respectively.
Once the initial paper design is completed, almost all of the information needed
for the report structure can be pulled directly from the paper design using
a ruler. This picture takes the sketch of the report and refines it to show
what the final report will look like. The areas for the header, footer, and
body have been marked with green, red, and yellow boxes respectively.
The first things to determine for the report structure are the AT attributes of the HEADER, REPORT (body), and FOOTER blocks. To determine these, measure the horizontal and vertical distance from the top left corner of the page to the top left corner of the area and use those values as the first two parameters for AT. Measure the distance from the top left corner of the area to the bottom right corner of the area and use those values as the last two parameters for AT.
For my report, the measurement unit is 1/1000" and the report is being designed on an 8.5"x11" piece of paper. In order to convert my measurements (inches) into Clarion values (1/1000"), I will need to multiple each value by 1000 after I measure.
For the header (green), the top left corner is 0.5" from the left edge
of the page and 0.5" from the top of the page. The header area extends
7.5" to the right of this point and 3.5" down. These measurements
translate into HEADER,AT(500,500,7500,3500).
The top left corner of the footer (yellow) is 0.5" from the left edge of
the page and 9.5" from the top of the page. It is 7.5" wide and 1"
tall, which translates to FOOTER,AT(500,9500,7500,1000).
The body covers only the area that detail lines are printed in. This is the red box on the report. It does not include any headers for the detail area, which means that the gray headers above the detail lines will not be inside of any of the three regions of the report. The body measurements are made the same way as the header and footer measurements and the AT attribute belongs to the REPORT structure line.
For this report, the body starts 0.5" from the left edge of the page and
extends 7.5" across the page. The detail header starts 4.5" from the
top of the page and is 0.3" tall, so the detail area starts 4.8" from
the top of the page. It extends down to the top of the footer (9.5" from
the top), so it is 4.7" tall. This translates into REPORT,AT(500,4800,7500,4700).
I like to leave a little extra space around the details, so I will move the top of the body down 0.1" and pull the bottom of the body up 0.1". To do this I add 100 units (0.1") to the vertical starting point (parameter 2) and subtract 200 units (0.1" on top and 0.1" on the bottom) from the vertical size. The report structure without any details looks like this:
REPORT,AT(500,4900,7500,4500),FONT('Arial',8,,),THOUS
  HEADER,AT(500,500,7500,3500)
  END
  FOOTER,AT(500,9500,7500,1000)
  END
END
Using the same method for calculating positions, I next create all of the text
and graphics for the FORM. The items to be placed on the form are shown in dark
red in the original sketch. When creating the form, I create it to cover the
entire page, so the form declaration line is FORM,AT(0,0,8500,11000).
Then each of the elements on the form is located with respect to the top left
corner of the page.
For example, the logo (which is a Windows metafile) is 0.5" from the top
of the page and 0.5" from the left edge of the page. The logo is declared
inside the form as IMAGE('LOGO.WMF'),AT(500,500), using the 0.5"
values to determine the position (first two parameters) of the image and leaving
the size (last two parameters) blank so that they will default to the size of
the image.
This same technique is used to position all of the items on the form. By measuring their position with respect to the top left corner page I am able to determine a specific set of coordinates so that the form will look almost exactly like my paper report design.
This is my final FORM structure:
FORM,AT(0,0,8500,11000)
  !Logo and address
  IMAGE('LOGO.WMF'),AT(500,500)
  STRING('W Corporation'),AT(2500,650), |
    FONT(,12,,FONT:bold)
  STRING('One ABC Drive'),AT(2500,850),FONT(,10,,)
  STRING('Albuquerque, NM 89012'),AT(2500,1050), |
    FONT(,10,,)
  STRING('USA'),AT(2500,1250),FONT(,10,,)
  !Invoice and date block in top right corner
  !Notice FILL on BOX and TRN on STRINGs
  BOX,AT(5500,700,2500,250),FILL(0C0C0C0H)
  LINE,AT(5500,700,2500,0),COLOR(00H)
  LINE,AT(5500,950,2500,0),COLOR(00H)
  LINE,AT(5500,1300,2500,0),COLOR(00H)
  LINE,AT(5500,700,0,600),COLOR(00H)
  LINE,AT(6750,700,0,600),COLOR(00H)
  LINE,AT(8000,700,0,600),COLOR(00H)
  STRING('Invoice #'),AT(5600,725,1050,200), |
    FONT(,10,,),TRN,CENTER
  STRING('Date'),AT(6850,725,1050,200), |
    FONT(,10,,),TRN,CENTER
  !“Sold To” and “Remit To”headers
  !TRN is not necessary because the STRINGs are
  !not on top of anything
  STRING('Sold To:'),AT(1250,2250),FONT(,10,,)
  STRING('Remit To:'),AT(5000,2250),FONT(,10,,)
  !Lines and headers for details and footer
  BOX,AT(500,4500,7500,300),FILL(0C0C0C0H)
  BOX,AT(6000,9500,1000,1000),FILL(0C0C0C0H)
  LINE,AT(500,4500,7500,0),COLOR(00H)
  LINE,AT(500,4800,7500,0),COLOR(00H)
  LINE,AT(500,9500,7500,0),COLOR(00H)
  LINE,AT(500,10500,7500,0),COLOR(00H)
  LINE,AT(500,4500,0,6000),COLOR(00H)
  LINE,AT(1200,4500,0,5000),COLOR(00H)
  LINE,AT(2200,4500,0,5000),COLOR(00H)
  LINE,AT(6000,4500,0,6000),COLOR(00H)
  LINE,AT(7000,4500,0,6000),COLOR(00H)
  LINE,AT(8000,4500,0,6000),COLOR(00H)
  LINE,AT(6000,9750,2000,0),COLOR(00H)
  LINE,AT(6000,10000,2000,0),COLOR(00H)
  LINE,AT(6000,10250,2000,0),COLOR(00H)
  STRING('Quantity'),AT(600,4650,500,200), |
    TRN,CENTER
  STRING('Item Code'),AT(1300,4650,800,200), |
    TRN,CENTER
  STRING('Description'),AT(2300,4650,3600,200), |
    TRN,CENTER
  STRING('Unit Price'),AT(6100,4650,800,200), |
    TRN,CENTER
  STRING('Extended'),AT(7100,4650,800,200),|
    TRN,CENTER
  STRING('Subtotal'),AT(6100,9550),TRN
  STRING('Sales Tax'),AT(6100,9800),TRN
  STRING('Freight'),AT(6100,10050),TRN
  STRING('Total'),AT(6100,10300),TRN
END
The same measuring technique that was used to position the controls in the FORM is used to position the control in the HEADER and FOOTER. The only difference is where the control positions are measured from.
The controls for the FORM were measured relative to the top left corner of the
page. Because the FORM was declared AT(0,0...,
the top left corner of the FORM was at the top left corner of the page.
For the HEADER and FOOTER, the top left corners are at (0.5",0.5")
and (0.5",9.5"), respectively. Each of the controls needs to be measured
relative to this point. For example, the first line of the “Sold To”
address is 1" to the right and 2" down from the top of the HEADER.
The AT attribute of this STRING is AT(1000,2000). All of the other
controls are measured and located in the same way.
At this point, the only structures left to create are the DETAIL bands. This report is a simple report with one DETAIL band. It could have had many more. All DETAIL and GROUP structures are printed inside the area declared as the body. For this report, the body is AT(500,4900,7500,4500).
To determine the position of each item in the DETAIL, draw a detail line into the report body area and then measure the distance of each item in the detail from the top left corner of the body. (This is the big red square on the second report sketch.)
Since I happen to have my sketch right here, I can see the five items in the DETAIL band and measure them. This is what I discover:
| Item | Distance from left (Inches) | Width (Inches) | AT |
| Quantity | 0.1 | 0.5 | AT(100,,500,) |
| Item code | 0.8 | 0.8 | AT(800,,800,) |
| Description | 1.8 | 3.6 | AT(1800,,3600,) |
| Unit price | 5.6 | 0.8 | AT(5600,,800,) |
| Extended | 6.6 | 0.8 | AT(6600,,800,) |
I have done a couple of things here that are worth noting. First, I have explicitly specified the horizontal position and width of every item. By doing this, I have made sure that the area covered by the items in the detail band is positioned exactly between the lines.
Here are the vertical dividing lines from the FORM structure:
LINE,AT(500,4500,0,6000),COLOR(00H)
LINE,AT(1200,4500,0,5000),COLOR(00H)
LINE,AT(2200,4500,0,5000),COLOR(00H)
LINE,AT(6000,4500,0,6000),COLOR(00H)
LINE,AT(7000,4500,0,6000),COLOR(00H)
LINE,AT(8000,4500,0,6000),COLOR(00H)
Here is the DETAIL structure:
Detail DETAIL
  STRING(@n6),AT(100,,500,),USE(RQ:Quantity),RIGHT
  STRING(@s15),AT(800,,800,),USE(RQ:ItemCode)
  STRING(@s60),AT(1800,,3600,),USE(RQ:Description)
  STRING(@n9.2),AT(5600,,800,),USE(RQ:UnitPrice),RIGHT(5)
  STRING(@n11.2),AT(6600,,800,),USE(RQ:ExtendedPrice),RIGHT(5)
END
And here is how the two fit together:
![]()
By specifying both the left (first) and width (third) parameters, I can declare an exact area (the gray area) that the text should be printed in and left- or right-align the text within that area. Notice that Quantity, UnitPrice, and ExtendedPrice are all right-aligned and ItemCode and Description are left-aligned.
I also omitted the vertical position (second) and height (fourth) parameters from the AT attribute of each STRING and omitted the entire AT attribute from the DETAIL. By doing this, the strings end up at the top of the DETAIL and the DETAIL is as tall as the tallest item. Because none of the strings have a height, the DETAIL is the height of a single line of text, which makes perfect vertical spacing happen automatically.
With the report structure completely created, the only thing left is to write the source code to print the report. Because the page overflow, headers, and footers are handled automatically, only the detail lines need to be managed. For this report I loaded all of the detail lines into a queue. To print them, I just have to cycle through the queue and print the detail line. The code looks like this:
OPEN(Report)
LOOP Counter = 1 TO RECORDS(ReportQueue)
  GET(ReportQueue,Counter)
  PRINT(Rpt:Detail)
END
ENDPAGE(Report)
As you can see, the Clarion for Windows report engine makes actually printing the report simple. Group breaks are handled automatically using the BREAK structure, so the above code also handles group breaks if your report has them. (The only caveat being that you need to load the first record into memory before opening the report or your report will always break on the first item.)
 That's it. A well-designed report structure will do all the work of making your
reports look great. The only real “trick” is learning to measure
the location of the controls from the paper design.
That's it. A well-designed report structure will do all the work of making your
reports look great. The only real “trick” is learning to measure
the location of the controls from the paper design.
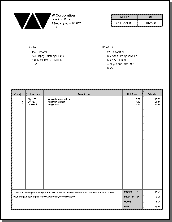
With this particular example, I think seeing is as important as describing the process, so I wrote a small program based on this report. This final picture is the output from the sample program. I've included a full-size version of the same report. I captured the .WMF preview from the sample program.
The sample program is a hand-coded program and includes the .PRJ, .CLW, and .WMF files needed. It is set up to copy the final .WMF to the Windows 95 desktop (C:\Win95\Desktop on my machine) so you may need to modify for your use.
Good luck with your reports!